2025 年度 OSS リテラシ3 : node.js + express
参考資料
はじめに
Node.js による Web アプリケーション作成入門 11 節~ に,データベースとの連動の例が掲載されている. 今回はこれをベースに GET, POST されたデータをデータベースに保存するプログラムを作成する.
インストール
最新版の node.js をインストールする.Debian パッケージでは バージョンが古い (Debian 13 は v20.19) ので, node の最新の安定版 (v22.21) をインストールする.
$ sudo -s
# curl -fsSL https://deb.nodesource.com/setup_lts.x | bash -
# apt install -y nodejs
バージョンの確認
# nodejs --version
 v22.21.0
さらに確認用に curl コマンドをインストールしておく.
# apt install curl

# exit
$
アプリを Express で作成する (Node.js による Web アプリケーション作成入門 11 節の抜粋)
まず,アプリケーションを作成するフォルダを用意する.
$ mkdir iotex_app
$ cd iotex_app/
次に,npm 自体をアップデートした上で Express を導入する. mysql モジュールもあわせてインストールしておく.
$ sudo npm install -g npm
$ sudo npm install express-generator -g
$ sudo npm install mysql
アプリの作成
アプリを作成する
$ express --view=ejs myapp

   create : myapp/
   create : myapp/public/
   create : myapp/public/javascripts/
   create : myapp/public/images/
   create : myapp/public/stylesheets/
   create : myapp/public/stylesheets/style.css
   create : myapp/routes/
   create : myapp/routes/index.js
   create : myapp/routes/users.js
   create : myapp/views/
   create : myapp/views/error.ejs
   create : myapp/views/index.ejs
   create : myapp/app.js
   create : myapp/package.json
   create : myapp/bin/
   create : myapp/bin/www

   change directory:
        $ cd myapp

   install dependencies:
        $ npm install

   run the app:
        $ DEBUG=myapp:* npm start
myapp アプリのフォルダに移動して npm パッケージをインストールする.
$ cd myapp
$ npm install
サーバを起動する.
$ npm start
ブラウザなどで Express の初期画面が表示されることを確認する. XXX は自分の IP に変更すること.確認できたら Ctrl-C (コントロールキーと c を一度に打鍵する) で止める.
ブラウザ --> http://10.100.111.XXX:3000
加えて curl コマンドでも確認をする.
$ curl http://10.100.111.XXX:3000

  <!DOCTYPE html>
  <html>
    <head>
      <title>Get Method</title>
      <link rel='stylesheet' href='/stylesheets/style.css' />
    </head>
    <body>
       <h1>Get Method</h1>
       <p>Welcome to Get Method</p>
    </body>
  </html>
ファイルの編集
教科書で指示されているように,作成された app.js を変更する.
- /users は使用しないため,/users 関連のコードを削除する.
- var で変数宣言している箇所を const に置き換える.
- 以下の 2 行を削除して app.use("/", require("./routes")); に置き換える.
- const indexRouter = require('./routes/index');
- app.use('/', indexRouter);
結果として,app.js は以下のようになる.
const createError = require('http-errors');
const express = require('express');
const path = require('path');
const cookieParser = require('cookie-parser');
const logger = require('morgan');

const app = express();

// view engine setup
app.set('views', path.join(__dirname, 'views'));
app.set('view engine', 'ejs');

app.use(logger('dev'));
app.use(express.json());
app.use(express.urlencoded({ extended: false }));
app.use(cookieParser());
app.use(express.static(path.join(__dirname, 'public')));

// router
app.use('/', require('./routes'));

// catch 404 and forward to error handler
app.use(function(req, res, next) {
  next(createError(404));
});

// error handler
app.use(function(err, req, res, next) {
  // set locals, only providing error in development
  res.locals.message = err.message;
  res.locals.error = req.app.get('env') === 'development' ? err : {};

  // render the error page
  res.status(err.status || 500);
  res.render('error');
});

module.exports = app;
routes/index.js についても,var を const に変更しておく.
const express = require('express');
const router = express.Router();

/* GET home page. */
router.get('/', function(req, res, next) {
  res.render('index', { title: 'Express' });
});

module.exports = router;
確認のために,再度サーバを起動する.
$ npm start
ブラウザなどで Express の画面が表示されることを確認する. XXX は自分の IP に変更すること.確認できたら Ctrl-C (コントロールキーと c を一度に打鍵する) で止める.
ブラウザ --> http://10.100.111.XXX:3000
加えて curl コマンドでも確認をする.
$ curl http://10.100.111.XXX:3000

  <!DOCTYPE html>
  <html>
    <head>
      <title>Express</title>
      <link rel='stylesheet' href='/stylesheets/style.css' />
    </head>
    <body>
       <h1>Express</h1>
       <p>Welcome to Express</p>
    </body>
  </html>
ブラウザや curl コマンドで表示される内容を決めているのは view/index.ejs である.view/index.ejs は以下のようになっており, <%= title %> に routes/index.js のres.render('index', { title: 'Express' }); で指定された title の中身 ('Express') が表示されていることが分かる.
<!DOCTYPE html>
<html>
  <head>
    <title><%= title %></title>
    <link rel='stylesheet' href='/stylesheets/style.css' />
  </head>
  <body>
    <h1><%= title %></h1>
    <p>Welcome to <%= title %></p>
  </body>
</html>
GET, POST メソッドへの対応
routes/index.js を以下のように POST メソッドに関わる記述を追加する.
const express = require('express');
const router = express.Router();

/* GET home page. */
router.get('/', function(req, res, next) {
  res.render('index', { title: 'GET method' });   //タイトルを GET に
});

/* POST home page */
router.post('/', function(req, res, next) {
  res.render('index', { title: 'POST method' });   //タイトルを POST に
});

module.exports = router;
確認のために,再度サーバを起動する.
$ npm start
curl コマンドで GET, POST メソッドでアクセスする.それぞれ, タイトルが GET, POST になっていることを確認すること!!
以下は GET メソッドの場合の例である.タイトルが GET であることが分かる.
$ curl -X GET http://10.100.111.XXX:3000

  <!DOCTYPE html>
  <html>
    <head>
      <title>GET method</title>
      <link rel='stylesheet' href='/stylesheets/style.css' />
    </head>
    <body>
      <h1>GET method</h1>
      <p>Welcome to GET method</p>
    </body>
  </html>
以下は POST メソッドの場合の例である.タイトルが POST であることが分かる.
$ curl -X POST http://10.100.111.XXX:3000

  <!DOCTYPE html>
  <html>
    <head>
      <title>POST method</title>
      <link rel='stylesheet' href='/stylesheets/style.css' />
    </head>
    <body>
      <h1>POST method</h1>
      <p>Welcome to POST method</p>
    </body>
  </html>
送信データの表示.
入力データは GET の場合は req.query.<input> 要素の name 値で取得でる. POST の場合は req.body.<input> 要素の name 値で取得でる.
今回は GET or POST で,name (名前), time (時刻), temp (温度) を送信するので, それを個々の変数に入力し,表示できるようにする.
まず,ビューを作る. views/index.ejs で,name, time, temp, IP を表示できるようにする.
<!DOCTYPE html>
<html>
  <head>
    <title><%= title %></title>
    <link rel='stylesheet' href='/stylesheets/style.css' />
  </head>
  <body>
    <h1><%= title %></h1>
    <p>Welcome to <%= title %></p>
    <ul>
      <i>name: <%= name %> </i>
      <i>time: <%= time %> </i>
      <i>temp: <%= temp %> </i>
      <i>IP: <%= ip %> </i>
    </ul>
  </body>
</html>
次に app.js を編集して,変数設定 (const から始まる行) の下に 以下を追加する.POST で JSON 形式のデータを送信するためである.
app.use(express.json()); // JSONボディをパースするためのミドルウェア
最後に routes/index.js を修正する.
const express = require('express');
const router = express.Router();

/* GET home page. */
router.get('/', function(req, res, next) {
   const name = req.query.name;
   const time = req.query.time;
   const temp = req.query.temp;
   res.render('index', {
      title: 'GET method',
      name: name,
      time: time,
      temp: temp,
      ip:   ip
   });
});

/* POST home page */
router.post('/', function(req, res, next) {
   const name = req.body.name;
   const time = req.body.time;
   const temp = req.body.temp;
   res.render('index', {
      title: 'POST method (YAML)',
      name: name,
      time: time,
      temp: temp,
      ip:   ip
   });
});

module.exports = router;
GET メソッドでデータを送ってみる.
$ curl -X GET "http://10.100.111.XXX:3000?name=jxxx&time=20251030150000&temp=24.2"

   <!DOCTYPE html>
   <html>
     <head>
       <title>GET method</title>
       <link rel='stylesheet' href='/stylesheets/style.css' />
     </head>
     <body>
       <h1>GET method</h1>
       <p>Welcome to GET method</p>
       <ul>
         <i>name: jxxx </i>
         <i>time: 20251030150000 </i>
         <i>temp: 24.2 </i>
         <i>IP: ::ffff:10.0.0.103 </i>
       </ul>
     </body>
   </html>
POST メソッドで JSON 形式のデータを送ってみる.
$ curl -X POST http://10.100.111.100:3000   -H "Content-Type: application/json"   -d '{"name":"jxxx", "time":"20251030150000", "temp":24.2}'

  <!DOCTYPE html>
  <html>
    <head>
      <title>POST method (YAML)</title>
      <link rel='stylesheet' href='/stylesheets/style.css' />
    </head>
    <body>
      <h1>POST method (YAML)</h1>
      <p>Welcome to POST method (YAML)</p>
      <ul>
        <i>name: jxxx </i>
        <i>time: 20251030150000 </i>
        <i>temp: 24.2 </i>
        <i>IP: ::ffff:10.0.0.103 </i>
      </ul>
    </body>
  </html>
受け取ったデータをデータベースに保存する (Node.js による Web アプリケーション作成入門 12 節の抜粋)
routes/index.js を編集して以下を行う.
- require 関数で mysql モジュールを読み込む
- データベースの接続情報を定義する.
- 接続先データベースは以前に作成した iotex とする.
- データベースへの接続を行うコードの埋め込み
- 教科書では GET メソッドの中で行っているが,1 回行えばよいので,外に出す方が良い.
- 受け取ったデータをデータベースに入力する INSET 文を発行し,成功したらページを表示する.
- 教科書ではプレースホルダを使っていないが,使った書き方にすべき.
これらを行った場合の routes/index.js の一部を抜粋する. POST メソッド部は自分で作成すること.また,穴埋め部分も行うこと.
const express = require('express');
const router = express.Router();
const mysql = require('mysql');  // mysql モジュールの呼び出し

/* MySQL 接続情報 */
const connection = mysql.createConnection({
    host: 'localhost',
    user: 'iotex',
    password: 'xxxx',
    database: 'iotex'
});

connection.connect((err) => {
   if (err) {
      console.log('error connecting: ' + err.stack);
      return
   }
      console.log('success');
});

/* GET home page. */
router.get('/', function(req, res, next) {

   const name = req.query.name;
   const time = req.query.time;
   const temp = req.query.temp;

   connection.query(
        ....................... // SQL 文
        (error, results) => {
           if (error) {
              console.error('DB Error:', error);
              return res.status(500).send('Database error');
           }
           // 成功したらページを表示
           .......
           .......
       }
   );
});

/* POST home page. */
.............
.............
課題:
前述の routes/index.js を完成させなさい.なお,プレースホルダを使う場合は,
connection.query(
     `INSERT INTO j4oss3 (name, temp) VALUES (?, ?)`,  //代入する箇所に ? を書く
      [name, temp],                                    //代入する変数の一覧を配列として与える.
      (error, results) => {
      // 以下略
のように書く.但し,3 行目の name, temp は変数である.
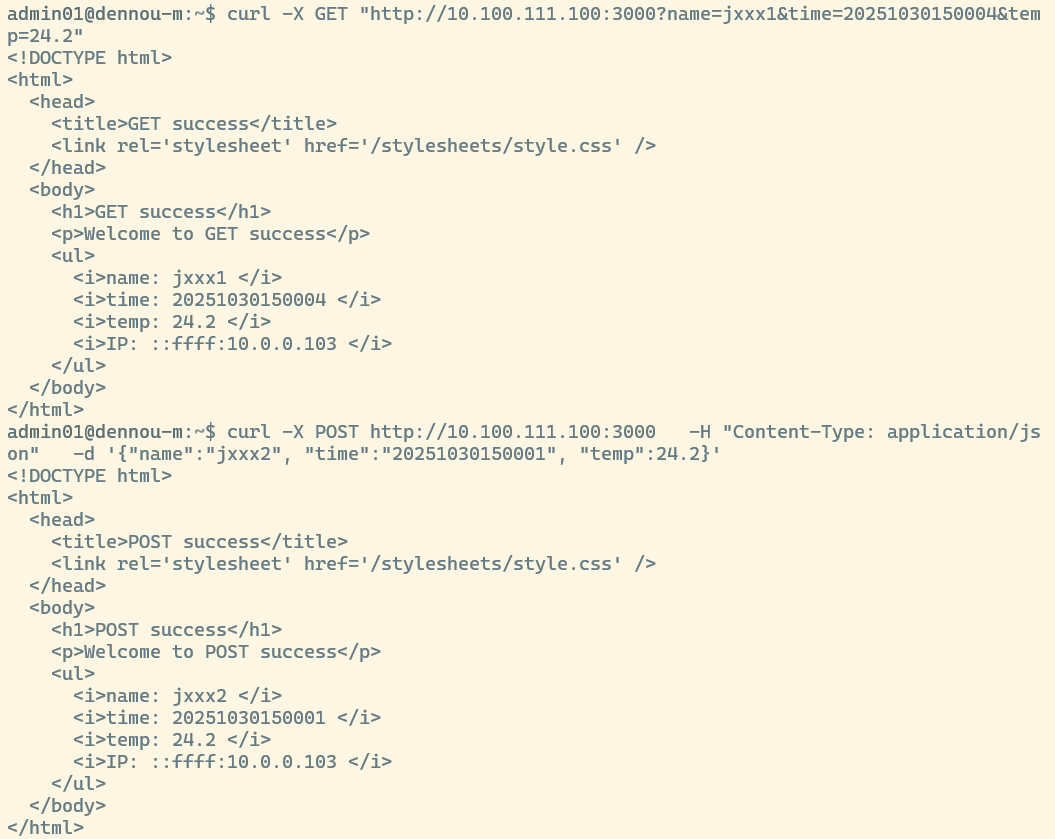
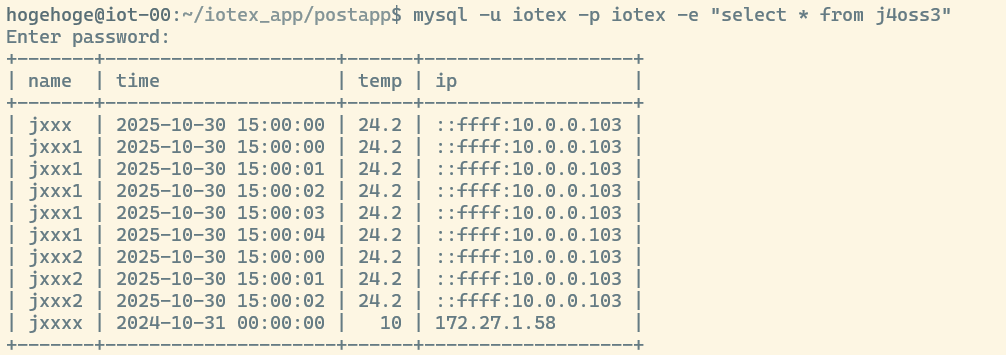
動作確認として,curl コマンドで GET, POST 両方の場合に対して URL を送信し,データベースに正しくデータが保存されたことを示す証拠を 提出しなさい.
具体的には,以下の 2 つを提出すること
- curl コマンドの送信とその戻り値の「スクリーンショット」
- select 文でデータベース中の該当テーブルの中身を表示した「スクリーンショット」
- 但し,上記 curl コマンドで指定したデータが入力されている必要がある.
発展 (1) : パスワード保護
このプロジェクトに Basic 認証のようなパスワード保護をかけるには, 例えば routes/index.js の変数宣言 (const で始まる文) の後に, 以下のようなコードを追加すれば良い.以下の例では, ユーザ名 iotuser, パスワード iotpass になっているが, ユーザ名とパスワードは各自適切に設定すること!
function basicAuth(req, res, next) {
   const auth = req.headers['authorization'];

   if (!auth) {
         res.setHeader('WWW-Authenticate', 'Basic realm="Secure Area"');
         return res.status(401).send('Authentication required.');
   }

   const base64Credentials = auth.split(' ')[1];
   const credentials = Buffer.from(base64Credentials, 'base64').toString('ascii');
   const [username, password] = credentials.split(':');

   // 認証情報のチェック(ここで任意のユーザー名とパスワードを設定)
   if (username === 'iotuser' && password === 'iotpass') {
        next(); // 認証成功
   } else {
        res.setHeader('WWW-Authenticate', 'Basic realm="Secure Area"');
        return res.status(401).send('Invalid credentials.');
   }
}

router.use(basicAuth);  // すべてのルートに適用

router.get('/', (req, res) => {
   // 認証済みの処理
   res.send('認証成功!');
});
確認方法
curl のオプションに -u iotuser:iotpass を付ける
$ curl -u iotuser:iotpass -X POST http://10.100.111.100:3000 -H "Content-Type: application/json" -d '{"name":"jxxx2", "time":"20251030150012", "temp":24.2}'
発展 (2): HTTPS 化
HTTPS 化するために,セキュリティ対策 (HTTPS) で 設定した鍵ファイルを流用する.簡単のために,自分のホームディレクトリにコピーして利用する. 但し,ユーザ名は hogehoge ではなく自分のユーザ名に変更すること
$ cd ~/
$ sudo cp /etc/ssl/private/j4oss3.key ./
$ sudo cp /etc/ssl/certs/j4oss3.pem   ./
$ sudo chown hogehoge j4oss3.key            <-- 自分のユーザ名に
$ sudo chown hogehoge j4oss3.pem            <-- 自分のユーザ名に
express のアプリについては,HTTPS 化するためには app.js に以下の行を追加する. ポート番号は 3001 としている.
// HTTPS 用の鍵の設定 ----------------------
const fs = require('fs');
const https = require('https');

const options = {
   key: fs.readFileSync('/home/hogehoge/j4oss3.key'),   //<-- 置き場を修正!!
   cert: fs.readFileSync('/home/hogehoge/j4oss3.pem')   //<-- 置き場を修正!!
};

https.createServer(options, app).listen(3001, () => {
   console.log('HTTPS Server running on https://localhost:3001');
});
//-----------------------------------------
確認方法
データ送信先を https://iot-XX.matsue-ct.ac.jp:3001 のように, プロトコルを HTTPS にし, IP でなくホスト名で指定し,ポート番号を 3001 に変更する必要があることに注意.
$ curl -u iotuser:iotpass -X POST https://iot-XX.matsue-ct.ac.jp:3001   -H "Content-Type: application/json"   -d '{"name":"jxxx2", "time":"20251030160012", "temp":24.2}'

  <!DOCTYPE html>
  <html>
    <head>
      <title>POST success</title>
      <link rel='stylesheet' href='/stylesheets/style.css' />
    </head>
    <body>
      <h1>POST success</h1>
      <p>Welcome to POST success</p>
      <ul>
        <i>name: jxxx2 </i>
        <i>time: 20251030160012 </i>
        <i>temp: 24.2 </i>
        <i>IP: ::ffff:172.27.1.139 </i>
      </ul>
    </body>
  </html>